


10 Reasons Your Suzuki TL1000 Clutch Cover Is Leaking (and How to Fix It)
A leaking Suzuki TL1000 clutch cover is not always fixed by fitting another gasket or tightening the bolts. On TL1000 R/S models, and on motorcycles using the same cover arrangement such as the Cagiva Raptor, the original cover can distort over time. The plastic cover face may warp, while the metal bolt sleeves or inserts gradually settle into the cover material. The result is reduced pressure on the O-ring, even when the bolts feel tight.
That is the main reason a new seal sometimes works for a short time and then starts weeping again. If the cover is no longer clamping the O-ring evenly, replacing the O-ring alone does not correct the underlying problem.
A billet cover provides a more stable sealing face, but you still need to confirm where the oil is coming from. A billet cover will not repair a leaking filler cap, damaged engine case, or worn seal behind the cover.
The ten questions below cover the reasons a TL1000 clutch cover leaks, how to confirm which one you are dealing with, and what the correct repair is.
1. Why has my TL1000 clutch cover face warped?
The original TL1000 clutch cover can distort between its fixing points. This is commonly caused by age, repeated heat cycles, impact damage, or bolts being tightened beyond the correct torque.
A cover can look acceptable when it is removed but still have enough distortion to lose O-ring compression in one section. Oil will normally appear at the lowest point of the cover, so the visible leak is not always directly opposite the damaged area.
Remove the cover and check the sealing face on a genuinely flat surface. A straight edge placed across the face will show obvious gaps. You can also check between the fixing bosses with feeler gauges. Do not rely on visual inspection alone.
2. Why do the bolt inserts stop the cover sealing?
The original cover uses metal sleeves or inserts around the fixing bolts. As the cover ages, the surrounding material can compress or wear. The inserts then sit slightly proud of the sealing face.
When this happens, the cover can bottom against the inserts before it compresses the O-ring properly. Tightening the bolts further is not a reliable repair. It can increase distortion and damage the cover or threads.
Some owners remove and shorten the inserts slightly, then refit them with the correct O-ring. That can restore clamping pressure on an otherwise usable cover, but it needs to be measured carefully. If several inserts have settled, or the cover face is already warped, replacement is the more dependable option.
3. What is the correct torque for TL1000 clutch cover bolts?
The clutch cover bolts do not need to be forced tight. Excessive torque can pull the cover down around the bolt holes and lift it between them. Uneven tightening creates the same problem on a smaller scale.
As a working reference, the clutch cover fasteners are commonly tightened to approximately 8 ft-lb, or 11 Nm, but you should confirm the specification for your exact model and year in the relevant service information.
Use this sequence:
Clean the bolt threads and the fixing holes.
Fit the O-ring and position the cover without dragging it across the sealing face.
Start every bolt by hand.
Snug the bolts lightly in a diagonal or star pattern.
Repeat the pattern, bringing each bolt closer to final torque.
Complete a final diagonal pass with a calibrated torque wrench.
There is no benefit in using a long ratchet and leaning on these small fasteners. Correct, even clamping is what seals the cover.
4. How do I know if the clutch cover O-ring needs replacing?
The O-ring must be the correct size for the cover and model year. A seal that is too thin will not provide enough compression. One that is too large can move out of the groove or become pinched during installation.
Inspect the seal for:
Flat spots
Cuts or nicks
Hardening
Stretching
Areas that have swollen from oil or chemicals
Clean the groove before fitting the replacement. A light coating of clean engine oil or suitable rubber-compatible grease can help hold the O-ring in place. Do not stretch it around the groove. Seat it naturally and check that it is not twisted.
A new O-ring cannot compensate for a warped cover or proud bolt inserts, so check the cover as well.
5. Can heat cycling cause a TL1000 clutch cover to leak?
The TL1000 engine produces substantial heat, and the cover, fasteners, O-ring and engine case all expand and contract at different rates. Over years of road use, track use and repeated servicing, this movement can reduce the available sealing margin.
Heat cycling does not necessarily create an immediate leak. It can gradually flatten the O-ring, loosen the material around the inserts and make a previously sound cover more sensitive to torque or surface contamination.
This is why a cover may seal after a rebuild and then begin to weep after several rides. If the original cover is showing age-related distortion, replacing only the seal is treating the symptom rather than the cause.
6. Is the oil filler cap leaking, or the clutch cover?
Oil around the top of the cover does not automatically mean the main cover O-ring has failed. The filler cap and its seal can leak, particularly if the cap has been cross-threaded, over-tightened or fitted with a flattened seal.
Clean the area completely and check where fresh oil first appears. Inspect the cap, its sealing surface and the surrounding threads. Oil from the filler cap can run down the cover and make the perimeter appear to be leaking.
The filler cap should tighten positively without excessive force. If the seal is hard, damaged or permanently compressed, replace it. The Psycleworkz Suzuki TL1000 R/S billet clutch cover is supplied with an oil filler cap as well as the O-ring.
7. Can a cracked or porous cover be repaired?
Porosity is more commonly associated with cast aluminium components, but any damaged cover or engine case can develop a seepage path. Look for staining, hairline cracks around the fixing bosses, impact marks and oil tracks that continue away from the main sealing joint.
Do not confuse an oil stain with an active leak. Degrease the area, dry it, run the engine at idle and watch for fresh oil. A talcum powder dusting or suitable leak-detection method can help show the starting point.
If oil is coming through a crack or porous section, sealant applied around the outside is not a proper repair. The damaged component needs to be replaced or professionally repaired.
8. How do I clean the clutch cover mating surface?
A good cover cannot seal against a damaged engine case. Check both mating surfaces for:
Old gasket material
Silicone residue
Scratches from screwdrivers or blades
Nicks around bolt holes
Corrosion
Embedded dirt
Raised edges caused by previous work
Clean the joint with a suitable solvent and a lint-free cloth. Use a plastic scraper or a blunt-edged tool for stubborn residue. Avoid gouging the aluminium surface.
The sealing face should be clean, dry and free from oil before assembly. If there is a local raised area, remove the cause rather than trying to compensate with a thick bead of sealant.
9. Should I use sealant on a TL1000 clutch cover?
The TL1000 clutch cover is designed to seal with its O-ring. Adding a large amount of silicone sealant is not a substitute for correct cover alignment and clamping pressure.
A thick bead can squeeze into the engine, break away internally and contaminate oil passages or the clutch area. It can also hold the cover away from the case and make the sealing pressure less consistent.
If the manufacturer’s procedure or a known repair method calls for sealant, use only a very thin film of oil-resistant product and keep it away from areas where excess material can enter the engine. Do not use household silicone, bathroom sealant or a random general-purpose adhesive.
For a sound cover with clean surfaces, the correct O-ring installed without excess sealant is normally the preferred arrangement.
10. What if the leak is behind the clutch cover?
Before replacing the clutch cover, confirm that the leak is actually at the cover perimeter. Oil can come from a bearing, shaft seal, clutch mechanism or another joint behind or near the cover and then track along the outside.
Clean the whole area and identify the first point where fresh oil appears. Pay particular attention to the clutch mechanism and nearby seals. The clutch cover cannot stop oil passing through a worn shaft seal.
If the oil level is dropping quickly, the leak is active, or oil is reaching the rear tyre or front sprocket area, stop riding until the source has been found. A small-looking external leak can become a larger mechanical or safety problem.
Why a billet cover is the permanent fix for a distorted original cover
If inspection confirms that the original TL1000 cover has warped or its bolt inserts no longer allow correct O-ring compression, replacing the cover is more sensible than repeatedly fitting seals or tightening bolts.
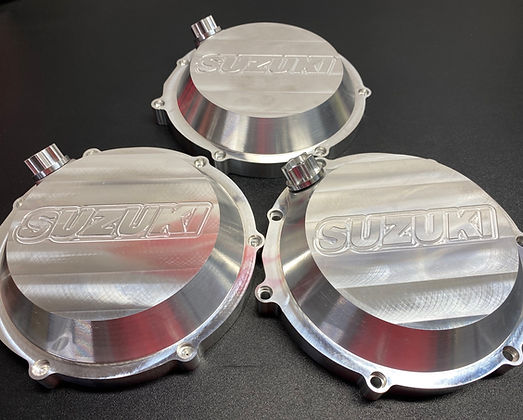
The Psycleworkz Suzuki TL1000 R/S Billet Clutch Cover is CNC machined from 6082-T6 aluminium and supplied with an O-ring and oil filler cap. It also fits the Cagiva Raptor. The listed price is £245.
The advantage is not simply appearance. A precision-machined billet cover gives you a stable, accurately formed sealing face and avoids the aged plastic cover and distorted insert problem described above. You still need clean mating surfaces, the correct torque and a sound engine-side seal, but the cover itself is no longer the weak part of the joint.
Psycleworkz also designs and manufactures other billet motorcycle parts, including CNC motorcycle parts for performance and racing applications. The engineering approach is informed by practical race use, including the company’s 2022 FIM Champion Pro Stock drag racing team competing in the FIM E Drag Race Championship across the UK, Sweden and Germany.

Final checks before running the bike
Once the repair is complete:
Confirm the correct O-ring is fitted and seated without twists.
Check the cover and engine mating faces are clean and undamaged.
Tighten the bolts gradually in a diagonal pattern.
Use approximately 11 Nm only where confirmed for your model and fasteners.
Recheck the filler cap seal.
Wipe the area completely dry.
Run the engine and look for fresh oil.
Take a short ride, then inspect the joint again.
If the leak remains after these checks, look beyond the cover itself. A billet Suzuki TL1000 clutch cover is the correct permanent repair for a warped or distorted original cover, but it cannot correct a damaged engine case, leaking filler cap or worn seal behind the cover. Diagnose the source first, then fit the component that addresses the actual fault.
Comments